Tuesday, December 10, 2019

Tuesday Tutorial and Blog Hop with Lori Whitlock

Welcome back crafty friends! Today is Lori Whitlock's December Blog Hop and my blog is the first stop on the hop, so be sure to hop back over to Lori's site too, because she has some goodies for you ... a sale, a giveaway, and a cute freebie!

For my project today I created some awesome twist pop Christmas cards with Santa! 

I have a video for you because they are so much more fun if you can see them in action :)


These are Lori's Twist-Pop cards. They are easy to make ... and here's a link to the tutorial so you can see where to add adhesive etc. (twist-pop card tutorial)

You can get this cute cutting file (links below) today on SALE! Once you've checked out all of the awesome hop designs, head back over to Lori's site for her sale, give-away, and freebie!


Blog Hop Order:

Traci Penrod 

Kathy Skou -- Next Stop

Anita Mulcahey

Brandie Adams

Aimee Kidd

Ashley Cook

Cathy Harper


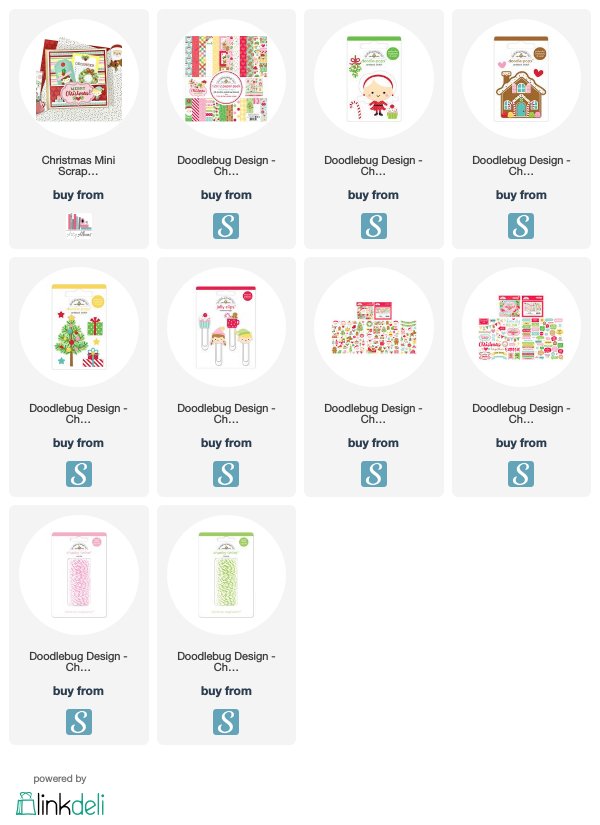
Supplies: As an Amazon Associate, I earn from qualifying purchases.  Affiliate links are used in this post at no additional cost to you. I receive a small amount of compensation when you click through and shop using the provided links. This helps me to continue building my small business. Thank you!

Thursday, December 5, 2019

Christmas Magic Waterfall Album / Folio

Hey friends! I don't know about you but I love opening the cover of an album and seeing pretty, colorful paper. And if it's Doodlebug paper, even better! I guess that's why I love waterfall albums so much. Earlier this week, I posted a tutorial for making a winter waterfall album. So, when it came to my latest Doodlebug Design Team project I was excited to recreate it with a Christmas theme!

Christmas Magic Waterfall / Folio by Artsy Albums
 
This adorable mini is a folio style album with a waterfall panel going down one side. Perfect for a gift or saving your own Christmas memories. I used the Doodlebug, Christmas Magic collection and it turned out so cute. I just love it!!
 
Christmas Magic Waterfall Album / Folio with a pocket and colorful waterfall pages
 
See what I mean? Look at all those colorful pretty patterns!! I know ... I'm such a paper nerd :) 
 
Christmas Magic Waterfall Album Page with cute elves and a christmas tree with ornaments
 
I used odds & ends, chit chat, icon stickers, and sprinkles to embellish the back of each flap. I plan to add photos to the fronts, but you could also add a gift card to some of the pages for a fun Christmas gift!
 
Christmas Magic Waterfall Album page with elves, gingerbread, candies, and a cupcake

I also used some stickers from the This & That sheet. I always love the little words and phrases.

Christmas Magic Waterfall Album page with elves, a christmas tree, and gifts

Although I used 12x12 pattern paper for the inside and outside covers, I used sheets from the 6x6 paper pad for each of the waterfall patterns.  I think the smaller patterns are perfect for these 4x4 spaces.
 
Christmas Magic Waterfall Album page with eles, a wreath, and presents
 
Oh my gosh, this collection is precious and so much fun to play with! I hope today's project inspires you, and don't forget ... click the below for a tutorial on how to make this waterfall style folio. Happy scrappin'!


Supplies: As an Amazon Associate, I earn from qualifying purchases.  Affiliate Affiliate links are used in this post at no additional cost to you. I receive a small amount of compensation when you click through and shop using the provided links. This helps me to continue building my small business. Thank you!  

Thursday, November 28, 2019

Doodlebug Fall Friends Thanksgiving Mini Album

Happy Thanksgiving!! Today, I'm sharing an older project since, well ... it's Throwback Thursday, I’m cooking turkey and don't have a chance to make a new Thanksgiving project, lol! But hey, this one is super cute thanks to a 2015 Doodlebug collection called Fall Friends. To read more about how I made this, visit the original post here.
 
 
To purchase the instructions for this album visit:


Below are the links for the instructions and the products used. I hope you all have a wonderful Thanksgiving holiday and happy scrappin'! 
 
 
Supplies: As an Amazon Associate, I earn from qualifying purchases. Affiliate links are used in this post at no additional cost to you. I receive a small amount of compensation when you click through and shop using the provided links. This helps me to continue building my small business. Thank you!

Tuesday, November 26, 2019

Tuesday Tutorial: Christmas Card, Silhouette Sketch Pen

It's almost the season for sending out Christmas cards! If you're like me, sometimes the task can feel too time-consuming that I almost lose sight of the meaning for sending them. With that in mind, I remembered this card I made for a blog post over at Lori Whitlock Designs a few years back. I wanted to revisit the tutorial and share it with all of you because it's going to make creating my cards a lot more fun this year.

I used my Silhouette machine and some sketch pens to create the front of my card. The sketch pen technique involves cutting a shape from inside an offset that's been drawn with the pens.
 

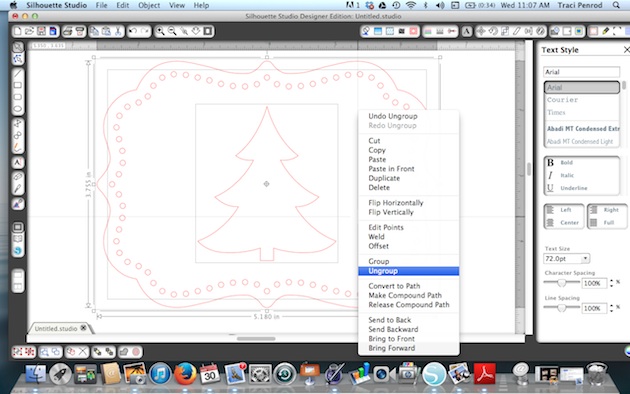
First, I started with Lori's adorable Christmas Tree Pop Up Card. I ungrouped everything and moved everything off to the side except the front panel with the tree.
 

Next, I ungrouped this one shape so that I could move the tree over to the left side of the shape.


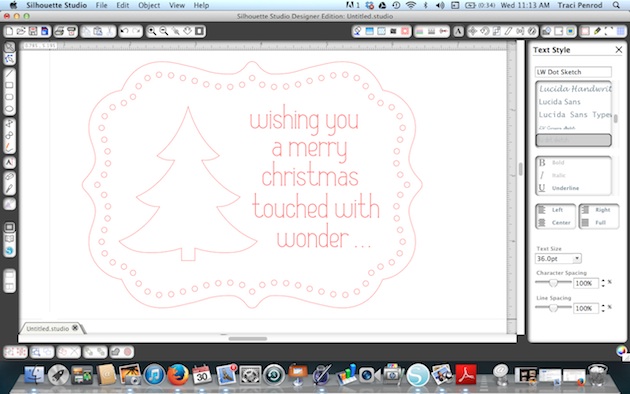
Once I moved the tree over to the left, I had space to put a sentiment. Using Lori's Dot Sketch Font, I typed in the sentiment that I wanted to use and centered everything the way I wanted it to look once it was sketched.
 

In addition to the sentiment, I also wanted an offset drawn around the tree cut out. To do this, I highlighted the tree, and opened the offset window. I clicked offset and set it to .05 distance.
 

For the next step, I moved the inside tree shape, and the outer card shape, off to the side. These portions will be cut out, so I didn't want them to get sketched when I insert my pen.
 

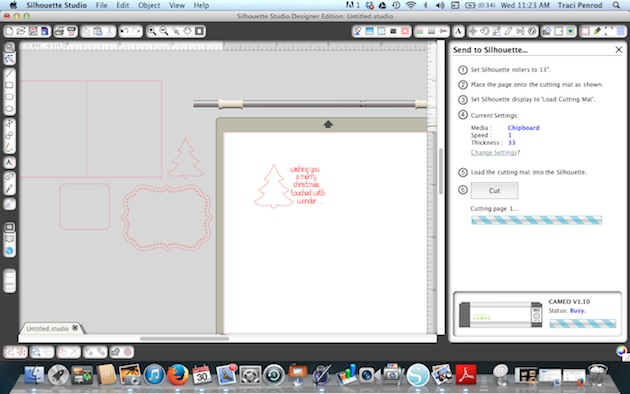
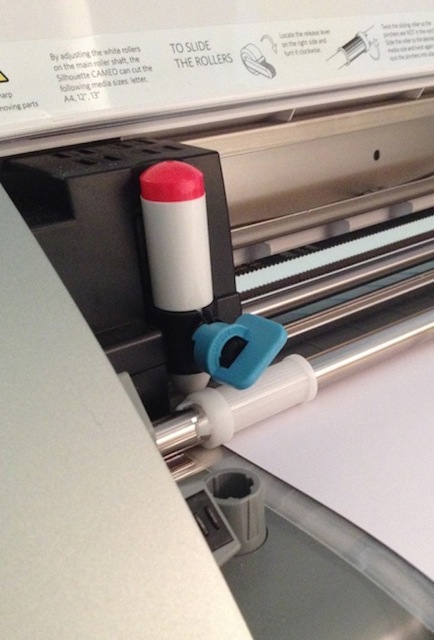
Next, I loaded white paper into my silhouette cameo machine and removed the blade. I replaced the blade with a red Silhouette sketch pen and locked it in place. Then I made sure my cut settings were set to Silhouette Sketch Pens, and I clicked "Cut".
 

Here is an important step! Once the sketch pen was finished drawing my lines, I didn't remove or unload my paper. The reason for this is because I want it to line up perfectly again when I go to cut the inside shape out of my tree. So I left the paper loaded exactly as it was when it was finished, and went back to my software.

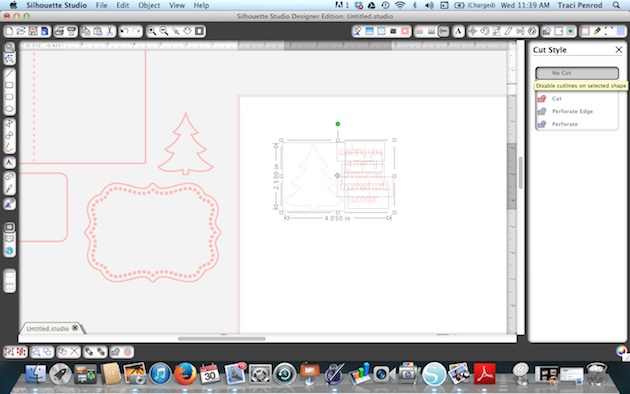
I highlighted everything that I had just sketched, and clicked on the Cut Style window. I chose "No Cut" so that when I replaced my red pen with a blade, everything I just sketched didn't get cut out.
 

Next I moved my card shape (which IS highlighted to cut) and the inner part of my tree (which IS highlighted to cut) back in place. I made sure that I replaced my red pen with my cutting blade, adjusted the cut setting to card stock, and hit the cut button again to tell my machine to cut out just those areas around my sketch.
 

For the inside of my card, I repeated the steps above to create a personalized "sketched" message inside the card before I cut it out.
One last tip -- I used a large needle to help thread my twine through the holes in the front of the card.


Thanks for stopping by the blog today for my "Tuesday Tutorial"!  If you plan to make your Christmas cards this year, I hope you have fun and enjoy the process :)


Blog * Facebook * Instagram * Shop

Thursday, November 21, 2019

Gift Card Holder Christmas Stocking Banner

Hello friends! Now that my kids are older, they love getting gift cards for Christmas. So, when I saw this adorable stocking cut file it gave me a fun idea. I'll hang this banner up on Christmas morning and not only is it a festive decoration, but it's also a cute way to dress up these little cards.

Gift Card Holder Christmas Stocking Banner by Artsy Albums
 
To make the stockings, I downloaded the Doodlebug Milk & Cookies Stocking cutting file from Lori Whitlock's SVG shop (link below). I separated the pieces and just kept the stocking base and white cuff portions. I enlarged the pieces so that the stocking measured 6.3" wide x 9.8" long.  
 
Gift Card Holder Christmas Stocking Banner
 
I cut out 4 stockings from thin chipboard, and 4 from white card stock. I made an internal offset of the stocking (set at 0.125) for the pattern paper and cut out 4 different patterns. 
 
I layered the chipboard, white card stock, and some adorable pattern papers from the Doodlebug Christmas Magic collection. Then cut out and adhered the white cuff to the top. I added names to each stocking using my cutting machine and the Bubble Letter Font cut file by Lori Whitlock (link below). 

Gift Card Holder Christmas Stocking Banner
 
I attached Doodlebug's 3x3 scallop envelopes on the back of the stockings to hold the gift cards, and then had lots of fun embellishing each stocking with Christmas Magic odds & ends, doodle pops, and jelly clips.
 
Gift Card Holder Christmas Stocking Banner
 
Finally, I strung a ribbon through the stocking loops and secured it to the chipboard with help from the jelly clips. This was a really fun project and I can't wait to hang it up on Christmas morning!
 
Supplies: As an Amazon Associate, I earn from qualifying purchases.  Affiliate links are used in this post at no additional cost to you. I receive a small amount of compensation when you click through and shop using some of the provided links. This helps me to continue building my small business. Thank you!


Blog * Shop * Facebook * Instagram * Pinterest

Wednesday, November 20, 2019

New! Safari Baby Journal Scrapbook Album

Heads up! Today, I have a really sweet NEW scrapbook album kit in the shop titled My Baby Journal. This mini is adorable with its gender neutral vibe, baby safari animals, soft colors, and cute plaids, stripes, and gingham patterns. It's a perfect keepsake for documenting all of those treasured newborn memories and milestones.

Safari Baby Journal Scrapbook Album for photos and memorabilia of a new baby

To purchase the instructions for this album visit:

I designed this with an 8x8 chipboard album by Prima and the Paper Studio, Baby Safari Animals Collection from Hobby Lobby. Check out the layered embellishments on the cover. So cute!!

Safari Baby Journal Scrapbook Album with a giraffe, zebra, monkey, and koala bear on the cover

Inside, the album has 12 scrapbook pages that include 2 pockets, 2 folding elements, and space for at least 25 of your child's (or grandchild's) precious photos.

Safari Baby Scrapbook Album Page with an elephant, zebra, penguin, giraffe, tiger, and lion

Above is one of those interactive folding elements that I like to call a flippie! I added a cute yellow print with adorable animals to the outside that can be used as a photo mat. And inside, I added a colorful plaid paper where you can include 2 more pictures.

 Safari Baby Scrapbook Album journaling page for your baby's birth information

I've included many wonderful lined journaling pages like the one above. There is one for baby's birth information, handprints and footprints, first home and first visitors, a family tree, memorable moments, and a growth chart!

Safari Baby Journal Scrapbook Album Page with a a pocket, journaling cards, gingham print, and lots of other cute animals 
 
Check out this cute interactive page. It has a folding card on top that's filled with smiling (and waving!) little animals. Open that up and there's a cute polka dot space for another photo. Then, there's also a pocket that's great for saving memorabilia like mom and baby's hospital bracelets, greeting cards, doctor's notes, or extra photos.
Safari Baby Journal Scrapbook Album Page with a cute elephant, gingham print, and lots of other cute animals

This would make an amazing handmade gift for a newborn, or fill it with all of the memories of your own little bundle of joy. Pictures and details of a sweet little baby will be treasured for years to come in this sweet baby book.

Safari Baby Scrapbook Album journaling page to document your baby's first home and visitors

My Do-It-Yourself Kit includes all of the materials and instructions to make this adorable mini album. It has pre-cut pattern paper, pre-cut photo mats and cardstock, journaling cards, coordinating stickers, layered embellishments, and full color step-by-step instructions.

You will just need some simple scrapbook tools to complete this project - a paper trimmer and/or scissors, adhesive tape runner, liquid glue, pop dots (or other dimensional adhesive), and a thin glue pen.

Hop over to my shop to see this wonderful album and the other new kits, premades, instructions, and supplies. Have a great day!

Update: This kit has sold out but the instructions are available in my shop. They are simple, step-by-step, and include full color photos of each page. Links for the instructions and some of the products used are below. Happy scrappin'! 

Blog * Shop * Facebook * Instagram * Pinterest 

Supplies: As an Amazon Associate, I earn from qualifying purchases.  Affiliate links are used in this post at no additional cost to you. I receive a small amount of compensation when you click through and shop using the provided links. This helps me to continue building my small business. Thank you!